Welcome back! If you’ve followed this program from the start, you come prepared for our five exercise, Extended Legs Back Roll – great job! You need to tread carefully on this one if you are not an athlete, and only after you’ve perfected the technique of the previous four exercises.
The series so far:
- Exercise #1: Rolling Over
- Exercise #2: Seal
- Exercise #3: Crab
- Exercise #4: Rocking Chair
- Exercise #5: Extended Legs Back Roll (you are here)
- Exercise #6: Boomerang
- Exercise #7: Controlled Balance
- Exercise #8: Jackknife
Exercise #5: Extended Legs Back Roll

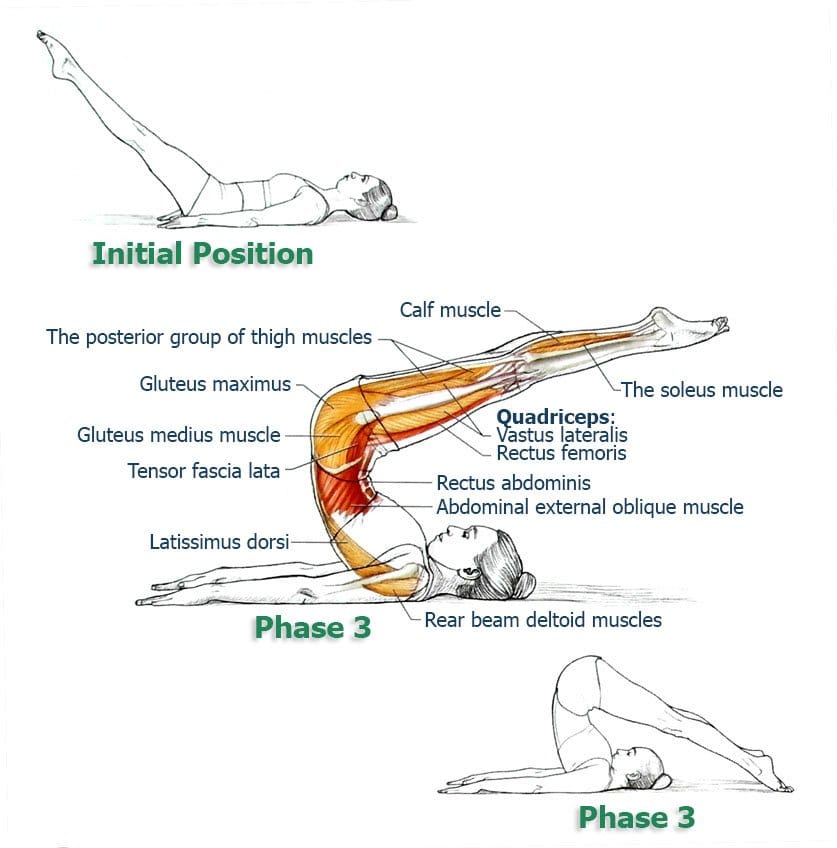
Initial position. Lie on your back, stretch your arms at your sides, palms down. Raise the straightened legs at an angle of about 60 degrees to the floor or even higher, if it will help you to better keep the stable position of the pelvis:
- Breathing in, raise legs vertically (hip flexion angle of 90 degrees);
- Breathing out, bend your spine, lift your hips off the mat and move then in a direction above the shoulders, while the feet extend above your head;
- Breathing in, lower the legs to the floor (if your flexibility allows) as shown in the figure, and then spread them shoulder-width apart;
- Breathing out: slowly roll back and lower the hips to the mat. After that, continue to lower the legs to the starting position;
- Repeat again, but now start it with the feet shoulder-width apart, and in the 4th phase, when the feet are behind your head, bring them together;
- Repeat 6 times overall, 3 per variant.
Make Sure You:
- In the 1st and 2nd phase of the Extended Legs Back Roll use the abdominal muscles to stabilize the pelvis and prevent excessive bending in the back, when the hip flexor muscles hold the weight of the legs and raise them in a vertical position;
- Continue to employ your abdominal muscles during the pelvis tilt and flexion of the spine at the beginning of the 3rd phase. People with flexible spine may need to simultaneously reduce slightly the back extensor muscles, in order to achieve uniform bending and avoid excessive bending in the middle and lower part of the spine;
- Use the hip joint flexor muscles to raise the feet of the mat in the 3rd phase and to control their descent in the 4th phase of the exercise;
- Pull your feet close to your body and make sure that the flexion of the lumbar spine is maintained as long as possible in the 5th phase, when the abdominal muscles control the gradual lowering of the torso to the mat. After it is lowered, switch the focus of the abdominal muscles to maintain stability of the pelvis and the waist and control the lowering the legs;
- During the exercise the legs should be straight and toes pointed. You should strive to extend the feet as far as possible, in whatever direction they are pointed;
- Taking the hips off the floor in the 3rd phase, press down hands firmly on the mat as the arm extensor muscles in the shoulder joint also help to raise the torso. In the 5th phase the arms are in the same position and also play an important role.
Additional Notes
It is important to start the movement from the pelvis to consistently bend the spine in the lumbar region, vertebrae by vertebrae. The muscles of the abdomen will tilt the pelvis backward. Posterior pelvic tilt activates more muscle fibers in the lower abdominal muscles and thus contributes to the stability of the center. In addition, the Extended Legs Back Roll does a good dynamic stretching of the hip and back muscles.
Despite the undeniable benefits of this exercise, a forced flexion of the spine in the thoracic and cervical region occurs under the influence of gravity. This is not always acceptable and valid for all individuals. Do this exercise only if you do not feel discomfort in the back and neck. Consult with your doctor and if necessary give up the exercise, or make appropriate modifications.
Modifications
In the 3rd and 4th phases of the exercise, extend the legs behind the head only as long as the weight falls on the shoulders and upper back, and not the neck. This will reduce the load on the cervical vertebrae. If you are missing some flexibility, in the beginning it is enough to keep your feet parallel to the floor. Touch of the mat is optional. If this is also difficult, you can additionally slightly bend the knees when they are over your head. If a tightness of muscles in the lower back or shoulders does not allow to raise the hips above the shoulders, bend your elbows and place your hands on your lower back to create support for the body.

